Search This Blog

Saturday, December 4, 2021

Friends of Unity December Blog Hop

 Hello everyone. I hope your December is starting off wonderfully. I love this month for the magic it brings. Now if it was just a bit warmer it would be perfect.  

It's time for the Friends of Unity blog hop again. This month the theme is Vintage.


I made a couple of cards for this one. I am not sure about the second one but I do love this first one.

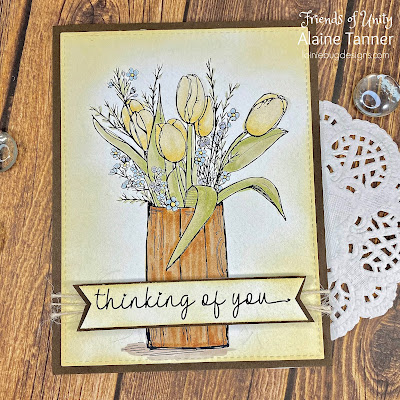
I used this beautiful image from Unity Stamp Co's monthly membership kit. This one is from December called Smile Wider Laugh Longer  To help give the colors a more vintage feel, I colored over the whole image with W1 and W0 first before coloring with some muted Copics. The edges are inked with Distress Oxide Antique Linen. I love the soft look of this one and the picture really doesn't do it justice.

Most of the time when I think of vintage looking cards, I think of masculine cards. My next card is perfect for the guys in your life.

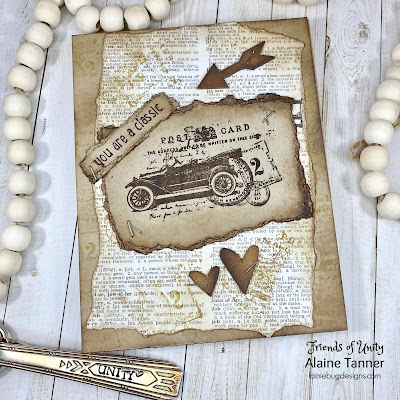
This one uses You are a Classic. I stamped it on some book page paper I got from Amazon. I used Distress Oxide in ground espresso on Kraft paper. I used the same stamp to add some texture to the kraft background and the book page. I used Distress Oxide in walnut stain to add even more distressing to the pieces. The hearts and arrow where white chipboard pieces that I inked with ground espresso. I used a tiny stapler to add staples all over.

Be sure to hop along with everyone else and see their wonderful vintage creations.

Alaine-you are here


Saturday, November 6, 2021

Friends of Unity November Blog Hop

 Well hello everyone. I am super excited for this months Friends of Unity Blog Hop. This month we are doing Not a Card. I hope we do this again in the future because I had so many ideas and not enough time to do them. You are going to be amazed by everyone's projects so be sure to scroll to the end and hop along with us.


I have to admit that my project I finally settled on was heavily influenced by the upcoming holiday season and this wonder new stamp set released this week for Unity Stamp Co's Brown Thursday sale. You have to check out all the deals and new releases.

I made Ghiradelli square candy holders. They are so quick and easy and will be so much fun to have on hand to pass out to guest and friends. I started with the Christmas Linen Two paper pack from Unity. You have to check out their papers. They are such a perfect weight and quality and I was able to use them without having to layer them up with card stock. 

Here's a close up of a couple of them. I used the brand new stamp set "Sweet Treat Christmas" to decorate them. This set has 6 great images and sentiments and is absolutely perfect for these. The images are cookies which makes them great for lots of cards, but I was able to fussy cut the inside part of the cookie for these holders so they would fit a bit better. 

The candy square just fits right inside and I held them in place with just a couple of glue dots. 

Unity Stamp Co's paper pads are 6"x6" so I started by cutting them into 2" wide strips. You get 3 per piece of paper. I did pick designs that didn't have an up or down so the back side wouldn't be upside down once I folded them up.

You will need to score them in two places. Score at 2 7/8" and at 3 1/8". This will give you a 1/4" bottom for the pocket. You can make these any size if you want, just find the center and score 1/8" on either side. Fold on the score lines so the patterned side of the paper is facing out.

I decided to use an old corner punch on all four of the corners before assembling. To make a hole to tie the ribbon through, just carefully match up the top edges. I chose to punch a single 1/4" hole and tie the ribbon over the top edges. You could also punch 2 holes side by side and tie the ribbon in a bow. Once the corners and hole were punched, I cut some scrap papers from the same back and layered them on top of the front side. I glued down the stamped and colored images I had already cut out. I put the Ghiradelli square inside, making sure to fold the long end flaps to the back side so it fit a bit better. I held them in place with a couple of glue dots. Tie a ribbon at the top and sit back and admire your treat holders.

Don't forget to hop along with everyone this month and leave them lots of love in the comments.

Alaine-you are here


Saturday, October 2, 2021

Friends of Unity October Blog Hop

 Hello everyone. Welcome to October. I'm a cool weather kind of girl so I am loving the cooler days and the rain. The first of October also means it's time for the Friends of Unity to hop and share some projects using stamps form our favorite stamp company, Unity Stamp Co.

This month our cue is Techniques. Hopefully you will find some inspiration in my project and I know you will love all the rest. Be sure to hop along with all of us. You can find the hop list down below.


I chose to give stamp kissing a try. I will tell you right now, I wouldn't have even tried this without my lovely Misti stamping tool.


I started with the wonderful set Say it Big and picked the birthday saying. I always need birthday cards. I placed the stamp in my Misti in the center of a 4"x5" piece of card stock. I placed this up from the bottom because I knew I was going to need the space for the kissing technique. I inked it up with Distress Oxide ink in salvaged patina. I stamped this twice to get good coverage. Now this is the important part.  Leave the paper and the stamp in the Misti in the exact same place. Do not pull them out.


I used the background stamp Distressed Dots for the next part. I placed that in my Misti so that it would cover the birthday stamp. I just laid it over the paper I had stamped on, you can see it peeking out at the top. I inked this up with Distress Oxide ink in peacock feathers and slowly closed the door to the Misti. 

Because these are both nice, thick red rubber stamps, the door doesn't close all the way. I just very carefully pushed down on the edge until both stamps were touching. I wanted to make sure to get good coverage so I inked the background stamp again and repeated that step before moving on.

You can see that I have just the dots on this stamp now. Remove the background stamp from the Misti without disturbing the paper below and stamp away. 

The results are a fabulous polka dot look on that great big birthday stamp. I fussy cut it out, but you can just cut it down to a small rectangle or use the cut file from Unity. And then I had to mat it black so I fussy cut that too. Don't look too close. 

I finished the card by stamping a background with the same Distressed Dots stamp. I inked it first in peacock feathers and stamped. Then I cleaned the stamp and inked it with salvaged patina so soften the color a bit. I cut the panel down and wrapped the black string around it and popped the birthday panel up with foam tape. I matted the card base in black and stamped the word Happy from the set to finish it all off.

Now don't forget to hop along and check out all the fabulous techniques from everyone else.

Alaine-you are here


Saturday, September 4, 2021

Friends of Unity September Blog Hop

 Hello everyone. It's that time of month again where the Friends of Unity hop.


I am excited for this month. Our theme is a Color Challenge of Sage, White and Kraft. We would love for everyone to join in using their Unity Stamp co stamps.


I was able to make a couple of cards this month. My first one is pretty simple and I think would make a great masculine birthday card.


I started this card by blending Distress ink in Bundled Sage over an A2 panel. I splashed some water on to get those great oxide spots this ink is so perfect for. Once it was dry, I placed it in my Misti and stamped the new Topography background stamp in the same color. I stamped it a couple of times to get good impression and to build up the color just a bit for that tone on tone look. I blended the same in on a scrap of paper and stamped the gnome from Gnome-one Like You onto it. I then stamped it on Neenah Desert Storm and on white. I fussy cut the various pieces and reassembled it as a paper pieced image. I used the Happy Birthday dies from Chic Script Salutations die set also from Unity Stamp Co. I layered it all up with Neenah Desert Storm card stock.


I have to admit that I am totally in love with the background stamp I used on this card. You may see it many more times. I stamped the Tin Tile background stamp on Neenah Desert Storm cardstock with Versamark ink and heat embossed it with white embossing powder. I cut this down with a stitched rectangle die.  I then stamped the image and sentiment from Bloom from Within in the Distress Oxide Bundled Sage color. I used my Misti and stamped the color a couple of times. I left the image and panel in place and stamped again with Versamark ink and heat embossed it all with clear embossing powder. I popped this panel up with foam tape and placed the whole thing on a white card blank.

Be sure to hop along with the rest of the team. Also be sure to join in and share your cards made with this awesome color combo.

Alaine-you are here


Saturday, July 3, 2021

Friends of Unity July 2021 Blog Hop

Hello everyone. It's that time again for the Friends of Unity Blog hop. There will be lots of amazing inspiration for this months theme so be sure to read to the end and follow the hop.

First though, I loved all the comments I received for the June Hop and I hadn't planned on doing a prize but I decided to pick someone anyway. Celeste Goff, please email me at alaine63@gmail.com and I will get a fun, little prize out to you.

This month's fun theme is Summer Vacation. I had to say I just had my first summer vacation in about 6 years and it was wonderful. We drove down the Oregon coast for 5 days and had a blast.


I used the same stamp set for both my cards. I pulled out the July 2020 Kit of the Month from Unity Stamp Co called Life is Better in Flip Flops. You need to check out the Kit of the Month membership if you haven't. You get a full sheet of stamps and they are amazing.

I chose to use the flip flops from this kit. My first card I'm sharing was actually my second card I started. I got one card mostly done, made a bad color choice and "ruined it". So off to the side it went and I started on this card I'm sharing first.

I pulled out what looked like a summery 6"x6" pad of paper that has been in my stash forever and proceeded to stamp the flip flops 4 times. I cut out the pieces and glued them together. Then I added some rhinestones from Gina Marie Designs. I ripped up one of the papers that reminded me of grass and inked the edges with Rustic Wilderness Distress Oxide ink. I stamped the sentiment from the same kit and glued it all together. Fun and super easy to do.

This is the card I almost threw away. I had stamped the flip flops and doodled the border around it and watercolored them and the background inside the border. Then I stamped the sentiment along the bottom and washed a blue color all around it. But I picked one that was too dark and to similar to the flip flops and it was bad. So I operate on a "never through it away until you have slept on it" philosophy. 
The next day, I decided to cut the doodled box out and just laid it on a card blank. It seemed usable to I grabbed the star fish stamp from the same kit and some antique linen Distress Oxide ink and made a background for it. I stamped the sentiment again and doodled around it and filled it with the same color around the flip flops. To make sure the cardstock matched the tiny bit of blue you could still see in the border, I washed a piece of card stock to mat the stamped background on. And I LOVE how it turned out. So save those less than perfect attempts and give them a go another day.

Now be sure to hop along with the rest of the of the team for some wonderful inspiration and possible prizes.

Alaine-you are here


Saturday, June 5, 2021

Friends of Unity June 2021 Blog Hop

 Hello everyone. It's time for the monthly Friends of Unity hop. I'm excited for this hop because I am sure my fellow hoppers are going to give me lots of inspiration for this month's theme of Masculine cards. I do seem to struggle with those. Give me a pretty flower and girly colors any day.


Lets just jump right into my first card. This old truck stamp is one of my favorites and my husband will even tell you the make and year.

There are lots of stamps used for this card. The truck comes from Slowly Turning Classic. I water colored it with Distress Oxide inks. I used Chipped Sapphire & Hickory Smoke for the body and grill. Then I mixed a bit of Barn Red and Vintage Photo for the "rust".  The background is another Unity stamp called Wonky Stripe background. I inked it in Distress Oxide Speckled Egg and the misted it with water before stamping. The strip under the twine uses the same color and the tread stamp from You are Worth It. Last but not least is the sentiment which is from the itty bitty stamp set All About Dad. The string is May Arts Black Burlap String that I also got from Unity Stamp Co. PS this Mary Arts string is my absolute favorite and I know it seems like a lot of money but you will use this stuff all the time once you have it.

My second card came about from wanting to use a background I had created with some new supplies.


This background was created with Distress Spray Stain in Wild Honey and Twisted Citron. I just misted water color paper with water, then sprayed the 2 colors until I was happy. When I decided to make this card, I grabbed the Vintage Burlap background stamp to stamp over it. I used Distress ink in Mowed Lawn for the stamping. If you don't have this background stamp, run and put it on your wish list now. It makes the most wonderful textures and I've used it on several masculine cards since I got it. The birthday word is of course from the new dies Unity has., Say It Big coordinating dies are awesome. I cut this one 3 times out of black and layered them together. The outline die was cut out of tracing paper because I seem to have lost all my velum. I stamped the word Happy from the Say It Big stamp set and heat embossed it in white. This is a super quick and easy card.

As always, make sure you check out all the other blogs on the hop. You won't be disappointed, there is always so much inspiration.

Alaine-you are here

If you like the cards I share, I would love for you to check out my Instagram account. I put so many more cards there. @alaine_tanner


Saturday, May 1, 2021

Friends of Unity May 2021 Blog Hop

 Hello,  It's time for the Friends of Unity blog hop. This month's theme is Flora and Fauna. I do love Unity flower stamps. They are my favorite and make up a huge bit of my collection.


 I used one of my newer floral stamps for this card. The set is called Smile You are Loved and it has this beautiful flower image and great sentiments.

I stamped the image on Canson XL watercolor paper. I colored with with Art Philosophy Tropical palette. After it dried, I used a colored pencil to give it some shading and depth. After the panel dried, I die cut it with the Frilly Lace die from Gina Marie Designs.

Please be sure to hop along with everyone else. You won't be disappointed, there is always so much inspiration.

Alaine-you are here


Saturday, April 3, 2021

Friends of Unity April Blog Hop

 Happy Spring everyone. I am so looking forward to warmer weather. Today, the Friends of Unity are hopping and we would love for you to come along. Our theme this months is Birds and Bees. Perfect for spring weather.


My first card is of course a bird card. Chickens to be exact. I loved this set when I first saw it and I can't believe this is the first chance I have had to use it.

I used What's Up set for this card. I water colored the chickens with my Art Philosophy Pastel Dream palette. The background is Distress Oxide in Speckled Egg smooshed all over. I stamped the Chicken Wire background three times to cover the slimline size card.  The slimline die is from Gina Marie Designs and the circle dies are from Waffle Flower. I love their nested and additional nested dies in all the shapes. 


My second card is of course bees. I am super excited because I think this is my first "successful on the first try" shaker card.

I used the beehive and bees from the March 2020 KOM, Spring & Things. I water colored them with Distress Oxide inks. The background is two Distress Oxides smooshed in layers and then I used Honey Mustard to stamp the Honeycomb background over it. The sentiment is from Spring Unity. The die I cut the background with is from Gina Marie Designs. I just filled the shaker with some random white and yellow sequins and some yellow seed beads I had on hand. 


Be sure to follow along with the hop and comment as you go. I am offering a prize this month. Check back on next months hop to find out if you are the winner.

Alaine-you are here


Saturday, March 6, 2021

Friends of Unity March Hop

 Hello everyone. It's time for another Friends of Unity Blog hop. This month we are using a fun sketch as our inspiration. I had a lot of fun putting my own spin on it.

My first card is my favorite.
I started with a pretty piece of green patterned paper matted with a dark green card stock. I cut a strip of the same card stock for the side piece and placed a beautiful die cut over top. The die is Sizzix Crochet. I got new nested dies from Waffle Flower. Their nesting dies are amazing. I have always wanted dies that I could have a more slender mat and these are perfect. The image I picked from Unity Stamp go for this card is Possible, Not Easy. This has been a favorite set of images since they released it. I stamped it and the sentiment with Versafine Clair Nocturn ink. A few enamel dots in the top right complete the inspiration from the sketch.

While my first card was my favorite, this next one is a very close tie with how much I like how it turned out. It might be because that cute gnome is hard to resist.

I started by cutting a white panel of Canson Bristol Smooth paper down just a bit so I could mat it on black. I used two different heart Washi tapes down the left side. I stamped the gnome and the sentiment from Gnome-one Like You onto the white panel. I colored it with Zig Clean Color Brush markers. I used the Waffle Flower dies to be a template for the circles and drew them on with a .5 multiliner pen and just added random dots. I used the same pen for the sketch detail in the top right corner. I added some hearts from a Stamping Up background die and it was done. Super quick and easy.

Please be sure to follow along with the hop and leave some love and comments along the way. Have some fun with us and use the sketch to make your own card and share on the Unity Show and Tell Facebook page.

Alaine-you are here


Saturday, January 2, 2021

Friends of Unity January Hop

 Hello everyone. It's time for the Friends of Unity January Blog Hop. I knew I would like this month's theme but I am so in love the the simple elegance this combo has. 


This month we are doing Black & White themes and I couldn't stop making cards.


My first card uses the Buffalo Plaid background stamp that was die cut with a stitched die and mounted on a black card base. I stamped the image from Funny Farm on white card stock cut with a smaller stitched die and matted that in black card stock. The sentiment is from the same kit. I wrapped May Art black string around the image panel and then popped it up with foam tape. The sentiment also was popped up with foam tape, make sure to put a double layer on the end that hangs off the image panel.  

My biggest tip for these cards is to use a high quality, juicy black stamp pad. I stamped everything with my Versafine Clair Nocturne ink because it always comes out crisp and black. 


This card was inspired by some leftovers I had laying around on my desk. The flower and sentiment were rejected from another project and I was so happy to finally use them. The flower is from Magnolia Flowers, a really beautiful kit. This image was embossed with black embossing powder. The sentiment is from You Matter and was embossed with white embossing powder on the black card stock. I grabbed my new, absolute favorite background stamp, Polka Dance background. I cheated on the black & white theme a little and stamped this with Versafine Clair Midnight ink which is a dark gray. I grabbed a doily I had laying around and used that to anchor the flower and sentiment strip. The whole thing was matted with black card stock.

My next card used a technique I learned from another very talented Unie gal, Melinda aka itsacardknocklife on Instagram. I encourage you to go follow her if you haven't yet. She calls it a tattoo style and she is definitely better at it than I am.

I stamped the compass from the November 2019 kit of the Month, Wonder. Then I used 2 sizes of oval dies for my "templates" and traced them with Staedtler Pigment liner pens. I have a set of 6 different tip sizes and use used various sizes for the lines and extra dots. I added the lines coming off the ovals and lots of dots in random places. This panel was matted with black card stock also. I had wrote the Hello because I wanted a simple block style and couldn't find a stamp in my stash. The dies are new from Waffle Flower house and I can't rave enough about the sizes in the 2 sets of nesting ovals. I have wanted nested dies that make smaller borders on the layers forever. I plan on buying the circles also.

Be sure to hop along and comment on all the blogs this month.

Alaine-you are here